
PC Imaging Process - revised 2/26/2025 --MDH
This document is a revision from previous process from a while ago - I have not imaged any machines in a long time and some of these notes will need to be validated - this is just a brainstorm of known information and topics related to revisiting the process
Latitude 5510 is compatible with Windows 11 and it should work.
OSD Imaging Process for Sim computers:
As a backup, Sanger basement SomTech team has network ports available that we could use for imaging using PXE.
USB Thumb drive (older process) or PXE available (switch port would need to be configured in Sim for PXE).
If using USB thumb drive:
Make sure to have the most current OSD imaging files from endpoint [review process to update the USB with the most current files and make it bootable).
If using PXE:
Notify Network team and they can possibly enable a dedicated switch port for enabling Imaging using PXE protocol and then computers can use this port for imaging (ask if a mini-switch could be used off of this network jack/port for imaging multiple computers at once?)
For PXE, in the computer bios:
enable TPM, make sure it's on AHCI instead of raid, and secure boot is on
enable the pxe network stack in order for it to show up to pxe boot, after you tap f12
=========================================
[Older Reference Material below - currently reviewing as some parts may still be relevant to process:
Revised OSD imaging steps from Shane - July 2023
Sorry, I should have included for those of you using the Boot Media ISOs rather than PXE, it can be found here - \\rams\ts\EES\MECM\Boot Media\CurrentDev\VCU_CM_BOOT_22621_DELL_A00_DEV.iso
Endpoint Computing Team
Information Security Office
Technology Services | Virginia Commonwealth University
701 W. Broad St., Richmond, VA 23284
endpoint@vcu.edu
On Wed, Jul 19, 2023 at 1:49 PM Shane Conner <endpoint@vcu.edu> wrote:
Good Afternoon Endpoint Community,
The Endpoint Computing team has completed a pretty major review of our OSD UI++ configuration and have implemented the following changes in the DEV Boot Media for testing and feedback.
DEV Boot Media has been updated to WinPE 11, which includes new Dell WinPE drivers to support newer hardware.
We have removed the hardware preflight check window entirely and replaced it with a Windows 11 Hardware Readiness script that runs in the background. The results of this script will determine if Windows 11 is shown in the OS selection dropdown menu. If Windows 11 is compatible then it will be the default option, otherwise Windows 10 will be the default.
Back and Cancel buttons have been added to all pages
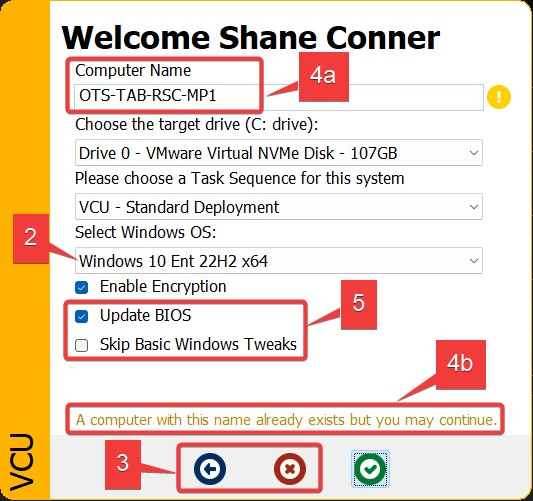
The checkbox and separate input page to choose a custom computer name has been removed and instead the Computer Name field exists on the same page where the Drive, Task Sequence, and OS selection is made. If the machine already exists in MECM, that name will be displayed by default, otherwise we will generate the name based on the DEPT-SerialNum format. Once you hit next on this page, it will check if the computer name exists in AD and if it does, you'll be given a Warning message that it should be removed. This is only a Warning and you can proceed if you wish but it will join AD on that existing object and not move it to a different OU that was specified earlier
The Advanced Options have all been moved to that main selection screen as well and the Update BIOS option is now checked by default.
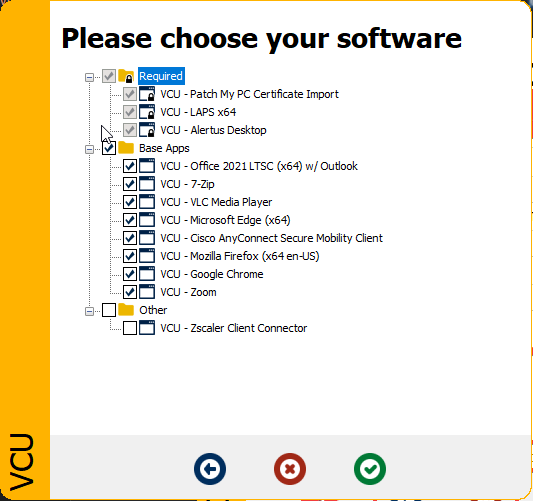
We have moved all application installs out of the "Base Apps" group and into a new feature called an AppTree. At this time we have all the same applications selected or required by default that were previously configured. We would love feedback on which other applications you all would like included in this.
Name is shown instead of eID
If the system already exists in MECM, we will automatically remove it without requiring a checkbox to indicate that it should be removed and we no longer have an Info page to state that it should be removed from MECM and AD. The removal action now doesn't happen until after the Ready To Go screen, preventing situations where a system is removed from MECM but then the technician cancels the OSD process.
Endpoint Computing Team
Information Security Office
Technology Services | Virginia Commonwealth University
701 W. Broad St., Richmond, VA 23284
endpoint@vcu.edu
======================================================================
OSD Process using MECM:
Questions:
Verify Process for Simulation imaging for Windows 11:
If systems supplied by SomTech they are already imaged with Windows 11 (confirm) and SimStaff will then join domain, configure apps, etc.
If systems are purchased and shipped directly from Dell, the operating system is pre-loaded from their factory and then SimStaff will finalize the operating system install and join to domain, etc.
Secure boot disabled or enabled in BIOS prior to imaging?
Boot method for clients
Boot media (USB)
PXE
Boot client using media
Authenticate to share for image deployment file
Join Domain? (or do this later in process after image installed?)
Followup tasks:
Printers
Verify windows updates installed
Device manager - verify
Scripts specific to desktop shortcuts for SIM
===================================
OLD (From previous doc/procedure)
Updated 03/15/18 mdh
Use MDT for base image deployment - create the computer in a workgroup and login as simtech when imaging complete.
Note: If computer is replacing an existing computer, rename the existing computer (add a letter or number to the existing name and reboot) to avoid conflicts with new computer’s active directory computer object.
Pre-Imaging:
Verify access to MDT Deployment share (this is needed for authentication during the imaging process
Boot the target machine into the BIOS
Disable secure boot
Use Legacy boot not UEFI
After imaging:
Verify device manager - install any additional required drivers (sound, etc.) if necessary.
Verify windows updates
Verify sophos updating and current versionVerify IE 11 web browser installed (may need to manually download/install-not part of windows updates)
Create computer object in Active directory - (if necessary, assign permissions to add the object to simadmin group or another specific admin user account.)
Change computer name from default to standard naming convention and Join domain.
Login as local admin and add SimAdmin group to local admins (use admin account credentials for this operation)
LAPS (Simtech) will be used once the machine is on the domain and deployed to production; exception - control room machines and machines with AV Viewer app installed will have simadmin as local admin….Simbackdoor put in local admins for PCs? Currently a member of might group which does not have local admin permissions to PCs….Otherwise simtech/laps is only local admin on PCs other than control room….discuss
Test domain user login
Enable remote access
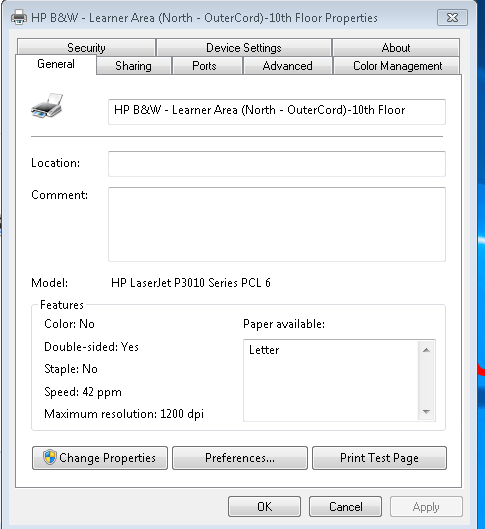
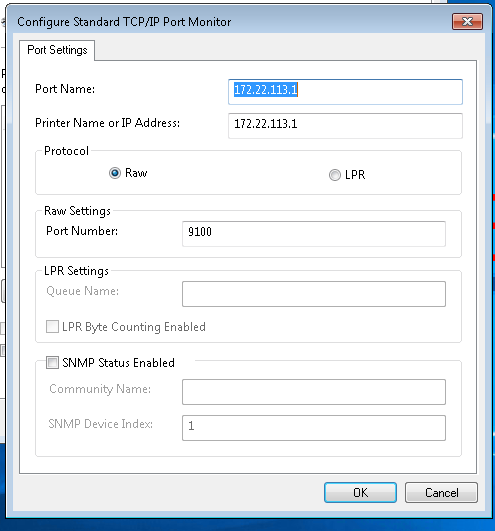
Add Printers if applicable
VLC (use the EMS-Web-Live-View version)
GPO login scripts - Desktop icons/shortcuts
Adobe reader instead of edge for default PDF reader (verify)
Any other additional programs outside of standard use.
Test with end user to verify required applications installed, shortcuts and overall functionality.
Windows 10 deployment (post image tasks):
Verify role of computer:
observation (more RAM) or for outer perimeter (lab), staff, simulator, control room, wallaroo, etc.. (Check Service tag)
If a reimage:
Rename existing PC for AD (thaw from deepfreeze as appropriate)
Verify old object renamed in AD.
Create new object in AD for new computer (use old computer name)
If new image, Create new computer object in AD
Rename newly imaged PC (reboot).
Login to EMS web view URL and verify firewall allow video/audio
Verify video (live, playback) - Install TViplayer
Join to domain (reboot)
Enable Allow-Remote-Desktop connection on new PC; verify simremote group
Add EMS to local admin (optional-remember to remove later)
Reboot and Login as EMS
Add a printer depending on location
Verify Sophos
Verify removal of EMS local admin
Login as Simlab2 and test EMS web view (authorize windows firewall).
Copy Sample video for loopback….(wildlife?)
Find keys for securing PC, unlock existing Kensington and put new PC in place (and re-lock). Make sure keys/locks are labeled for future use.
Post-deployment:
Remove old computer objects from domain
Surplus old PCs - keep a few for spares (still in good shape and windows 10-compatible)
Wishlist:
Separate, stored images for different types of machines - observation, lab/exam, staff, control room, etc. - research in progress…
Known Issues:
New Windows 10 machines - need to manually install LANdesk or choose this during the imaging process and test.
Audio driver for OptiPlex 3010 is not working after base image install; manual download and install updated driver from Dell site during build.
Windows 10 - Dual monitor config can cause windows start menu to not work when clicked on or when trying to use shortcut hot keys to open the start menu.
Helpful commands:
Boot to command prompt (F8) to get windows utils
To clear partitions:
1. Diskpart
2. List disk
3. Select disk 0
4. List part
5. Select part 1
6. Clean
7. Create part primary
8. Assign
9. Active
10. Exit
Misc:
10th floor printing config (outer corridor facing window across from hospital)
LTSB testing compared with standard enterprise image

OLD:
Install VLC (test EMS video through web) - this step may no longer be required as of migration to Pluto.
Install LanDesk agent (this is soon to be no longer a requirement)
for /f "tokens=1" %1 in ('dsquery computer "ou=Workstations,dc=example,dc=net" -o rdn -limit 0') do @wmic /node:%1 /failfast:on service where (StartName!="LocalSystem" and StartName!="NT AUTHORITY\\LocalService" and StartName!="NT AUTHORITY\\NetworkService") get Caption,StartName > c:\temp\svc-list-%1.txt